Tips and Tricks
• Remember that you can always cut more of your skin away, but that you can never cut less.
• Use the right tools! Razor blade, scissors, clean paper towel, etc.
• Completely clean the surface to which you are applying the skin. Nothing sticks to dirty surfaces.
• The more hardware you remove from your guitar prior to skin installation, the easier it will be to install your skin.
• If it takes less than one hour to install your skin, you are likely not being careful enough.
• Have a friend help you. Four hands are better than two.
• Once your skin is installed, you can touch up the edges of the skin with a black marker.
What You Will Need
• Warm, soapy water
• Paper towels
• Scissors
• Razor blades
• Soft Squeegee
Links
There are many differing opinions and suggestions to installing guitar skins. We suggest viewing the following videos to educate yourself prior to skin installation. Knowledge is a great thing...and can save time, money and aggravation. But lets be real here...you are sticking a piece of vinyl to your guitar. It isn't rocket science. Choose the method that seems easiest to you and go for it.
How To Videos
The following videos available on YouTube will provide you with different methods of installing your skin. We suggest you take a look at these videos and choose your preferred method prior to beginning the installation process. Please note that these videos are hosted on YouTube and are only linked here for your convenience. We do not own and didn't create these videos.
SkinYourSkunk.com has formulated a professional and proven process to provide you with the best guitar skin possible, designed to meet your specific needs, fit your specific guitar, bass or acoustic and position your skin for that perfect look.
Here is how the entire process works.
Choose Your Guitar, Pickguard or Headstock Skin Design
Browse our site, check out all the different categories and skins we offer and find something you like. Once you do, click the skin to zoom in for a closer look and if it is perfect...click the ADD TO CART button. At any time you can click one of our CHECKOUT buttons to edit your selections or complete your purchase. If you do not find a skin you like on our site, feel free to contact us with a graphic you would like made into a skin. We do custom work also!
Guitar Skin Design & Proof Approval
Once we receive your completed order...we will email you with a few questions. We provide customized skins to fit YOUR guitar! This includes sizing to provide the highest resolution print with correct positioning, and effects such as flipping, mirroring (for left handed guitars), lighten, darken, etc. After we collect this information, we modify the graphic to suit your needs and email you a "proof" (usually a PDF or JPG file) for your approval. This process usually takes less than 24 hours.
Printing & Shipping Your Skin
After you have approved your skin, we print the high-resolution graphic on our exclusive "Marine Grade" vinyl with a clear over-coat (glossy or matte) and adhesive backing. Your skin is quality checked, rolled, placed in a hard, cardboard tube and shipped. We ship with USPS or UPS, delivery confirmation and tracking.
Application of Your Guitar Skin
When you receive your skin, remove it from the tube and allow it time to flatten out (because it was rolled). This can be done by placing it face up on a table with a soft book or two laid on top. It may take a few hours to completely flatten. While you are waiting, you should collect your tools and prepare your work space for application. Below you will find our ever-evolving tips, tricks and instructions.
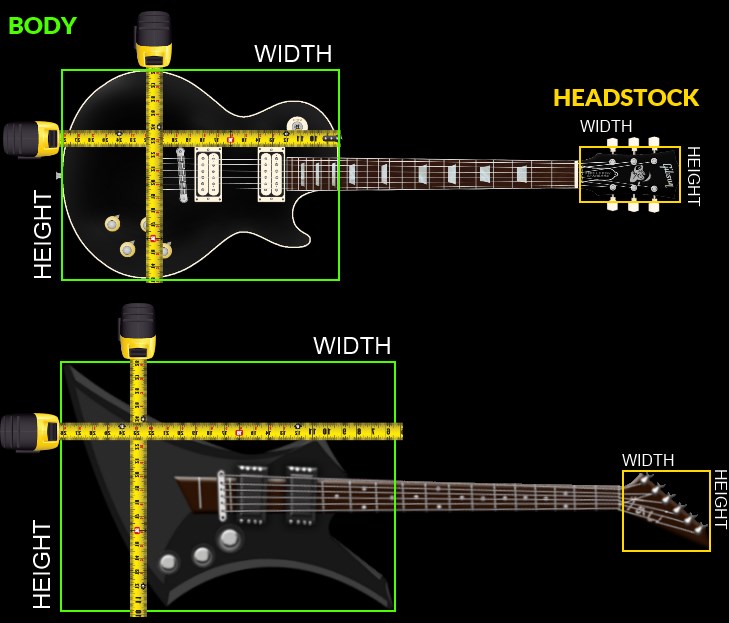
Measuring your guitar is very important, and very easy. As you see in this diagram, you measure the height at the tallest part of the guitar body and the width at the widest part of the guitar body. Round to the highest number of inches. You will then add 2" to the HEIGHT and WIDTH for padding.
Note: These videos are provided by other individuals and posted for public viewing on YouTube. They are educational and we feel they show and demystify the guitar skin installation process. These videos are not ours...we simply link to them for your use as they were intended. Why link to our competition's videos? We know our guitar skins are a superior product and acknowledge you have other choices. But a good video is a good video.